Introduction
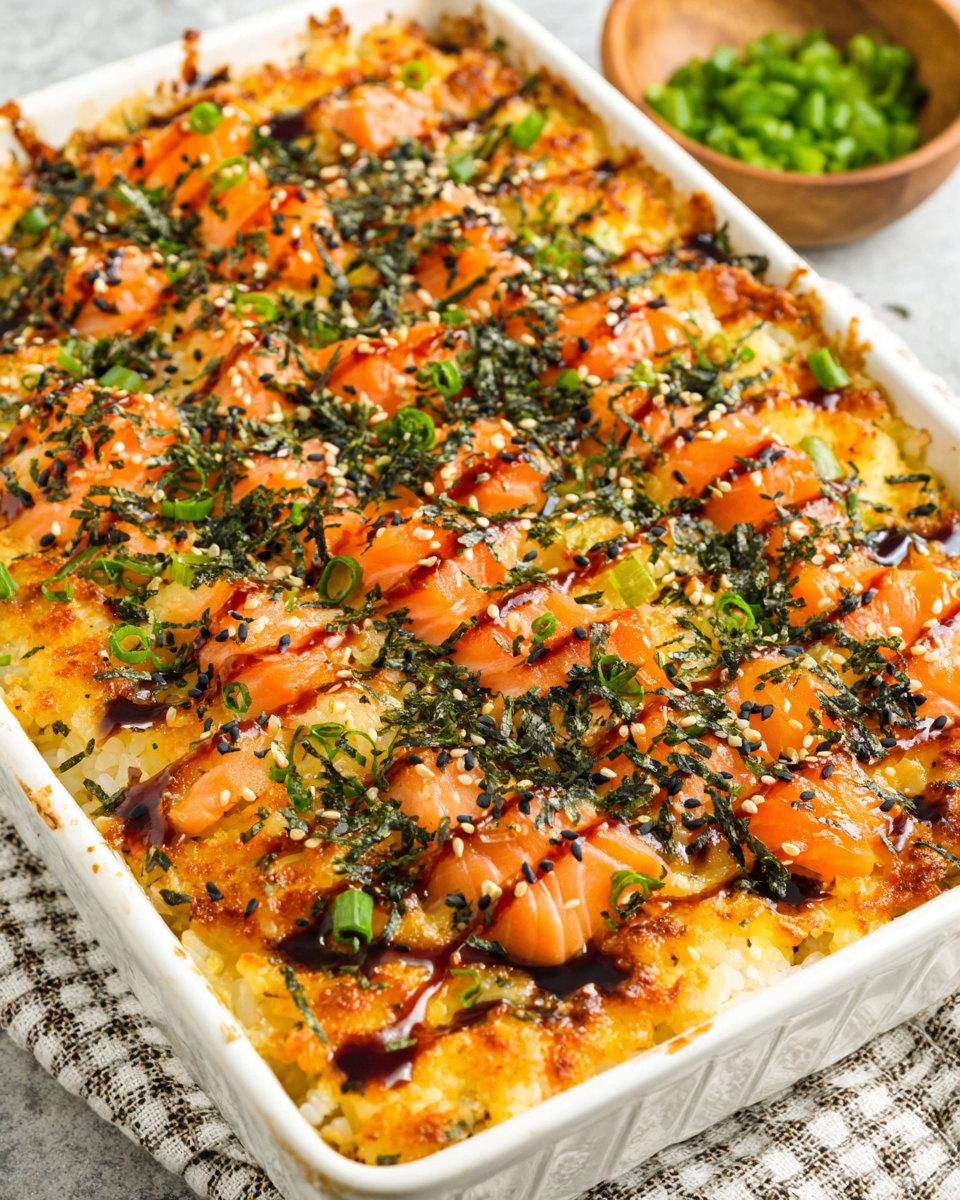
If you're looking for a fun and flavorful twist on dinner, the spicy salmon sushi bake is your answer. This inventive dish combines the best elements of sushi and comfort food, making it a viral favorite among home cooks.
The beauty of the sushi bake lies not only in its taste but also in its simplicity. Perfect for a cozy night in or for serving at small gatherings, this dish allows for easy customization and is sure to impress your friends and family.
Ingredients
- 2 cups sushi rice
The foundation of the sushi bake, sushi rice is sticky and slightly sweet, which helps it hold together and complement the other flavors. - 2 1/2 cups water
Water is essential for cooking the sushi rice to the proper texture. The right water-to-rice ratio ensures a perfect consistency. - 1/3 cup rice vinegar
Rice vinegar adds a tangy flavor to the rice, enhancing its sushi-like quality and balancing the spiciness of the salmon. - 2 tablespoons granulated sugar
The sugar helps to round out the acidity of the rice vinegar and contributes to the slightly sweet flavor profile of the dish. - 1 teaspoon salt
Salt enhances the overall flavor of the dish, ensuring that each bite is savory and satisfying. - 1 pound fresh salmon
Fresh salmon is the star of this dish, providing rich flavor and buttery texture. It can be seasoned and baked to bring out its natural taste. - 1/4 cup mayonnaise
Mayonnaise adds creaminess to the salmon mixture, helping to bind the ingredients together and creating a luscious topping. - 2 tablespoons sriracha
Sriracha introduces the dish's signature spiciness, making it a must-have ingredient for anyone who enjoys heat in their food. - 1 green onion, sliced
Green onion adds a burst of freshness and a mild onion flavor, enhancing the overall taste and presentation of the bake. - 1/4 cup furikake
Furikake is a popular Japanese seasoning blend that adds crunch and umami, elevating the finished dish with its savory notes. - 2 sheets nori, cut into strips
Nori provides the classic sushi element, adding a salty flavor and unique texture that complements the soft rice and salmon.
Directions & Preparation
Step 1: Rinse and cook the sushi rice.
Start by rinsing the sushi rice under cold water until the water runs clear. This step is crucial as it removes excess starch, ensuring the grains are not overly sticky. After rinsing, combine the rice and water in a pot and bring to a boil. Lower the heat, cover, and let it simmer until cooked. Properly cooked rice is fluffy, which adds to the comfort of this bake.
Step 2: Season the rice with vinegar mixture.
In a small bowl, whisk together rice vinegar, sugar, and salt until dissolved. Once the rice is cooked and slightly cooled, gently fold in the vinegar mixture. This step infuses the rice with a delicate tang, mimicking the traditional flavors of sushi, which enhances the overall taste of the bake.
Step 3: Prepare the salmon topping.
In a separate bowl, combine the fresh salmon, mayonnaise, and sriracha until well mixed. You can adjust the amount of sriracha based on your preferred heat level. This mixture will create a creamy, spicy topping that pairs beautifully with the rice, adding richness and flavor to each bite.
Step 4: Layer the sushi rice in a baking dish.
Spread the seasoned sushi rice evenly in a greased baking dish, pressing it down gently with a spatula. This step ensures that the rice creates a sturdy base for the salmon topping, allowing the bake to hold together when served. A firm layer also allows the flavors to meld better during baking.
Step 5: Add the salmon mixture on top of the rice.
Spoon the salmon mixture over the rice, spreading it to cover the entire surface evenly. This helps ensure that every bite contains a perfect balance of flavors. The combination of creamy salmon topping on the sticky rice creates a delightful contrast.
Step 6: Sprinkle with green onions and furikake.
Garnishing the dish with sliced green onions and furikake adds both visual appeal and flavor. The green onions provide a fresh crunch, while the furikake contributes a savory depth that elevates the taste of the sushi bake.
Step 7: Bake in the oven.
Preheat the oven and bake the dish until heated through and the salmon is cooked. Baking melds the flavors together while creating a crispy top layer. It’s during this step that the entire kitchen fills with rich, appetizing aromas, signaling that a delicious meal is on the way.
Step 8: Serve with nori strips on the side.
Once the sushi bake is out of the oven, let it cool slightly before serving. Providing nori strips on the side allows each guest to add their preferred amount, adding a fun, interactive element to the meal. The crispy texture of the nori complements the soft sushi bake beautifully.

Transforming Leftovers into Lunch
The spicy salmon sushi bake is perfect for making in larger batches, and any leftovers can be repurposed into a tasty lunch. Simply pack it into a container, and it can be reheated in the microwave for an easy meal. Consider pairing it with a fresh salad or steamed veggies to balance out the flavors and add nutrition.
Customizing Your Sushi Bake
One of the many joys of this recipe is its versatility. Feel free to experiment with different toppings such as crab meat, avocado, or even spicy tuna for a unique twist. You can also adjust the level of spiciness by varying the amount of sriracha, making it suitable for all heat preferences.
Elevating Your Dinner Presentation
Serving your spicy salmon sushi bake in a stylish dish adds an appealing touch to your dining experience. Consider garnishing with additional green onions, sesame seeds, or cucumber slices to enhance both the look and flavor. This not only makes the dish more inviting but also adds an extra layer of freshness.
FAQs
Can I use canned salmon instead of fresh?
Yes, canned salmon can be used as a substitute. Just ensure it is well-drained and flaked before mixing with the other ingredients.
What if my salmon is overcooked?
If you find that your salmon has overcooked, try adding a little extra mayonnaise to the mixture. This can help restore some moisture and creaminess.
Can I scale this recipe down for fewer servings?
Absolutely! Simply halve the quantities of each ingredient based on the number of servings you need.
What if I don’t have furikake?
If furikake isn’t available, you can create a similar flavor by mixing sesame seeds with a pinch of salt and dried seaweed.
How can I make my sushi bake spicier?
For a hotter kick, increase the sriracha or add diced jalapeños to the salmon mixture.
What can I do if my rice ends up too sticky?
If your rice is overly sticky, try fluffing it gently with a fork before assembling to break apart any clumps.
Conclusion
The viral spicy salmon sushi bake is not just a meal; it's an experience that invites creativity and enjoyment. With its rich flavors and comforting textures, it's bound to become a favorite in your home.
By following this easy recipe, you can impress your loved ones while enjoying the satisfaction of cooking at home. Dive into this delectable dish and let your kitchen become a hub of culinary delight.
Recipe Card

Layered Mexican Beef Casserole for Cozy Nights
Ingredients
- 1 lb ground beef
- 1 packet taco seasoning
- 1 can black beans 15 oz, drained and rinsed
- 1 cup corn kernels frozen or canned
- 2 cups tortilla chips crushed
- 2 cups salsa
- 2 cups shredded cheese cheddar or Mexican blend
- 1/2 cup sour cream
- 1/4 cup chopped fresh cilantro optional
- 1 jalapeño sliced (optional)
Instructions
- Preheat your oven to 350°F (175°C).
- In a large skillet, brown the ground beef over medium heat.
- Add the taco seasoning to the browned beef and mix well.
- Stir in black beans and corn, mixing until well combined.
- Spread a layer of crushed tortilla chips at the bottom of a greased casserole dish.
- Layer half of the beef mixture over the chips.
- Pour half of the salsa over the beef layer, spreading evenly.
- Sprinkle one cup of shredded cheese over the salsa.
- Repeat layering: chips, beef mixture, salsa, and cheese.
- Cover the casserole with aluminum foil and bake for 25 minutes.
- Remove the foil and bake for an additional 10-15 minutes, until cheese is bubbly.
- Let the casserole cool for a few minutes before serving.
- Garnish with fresh cilantro and jalapeño slices, if desired.
Notes
Additional serving suggestions: pair with a crisp salad, garlic bread, or roasted seasonal vegetables for balance.
For make-ahead, prep components separately and assemble just before heating to preserve texture.
Taste and adjust with acid (lemon/vinegar) and salt right at the end to wake up flavors.