Introduction
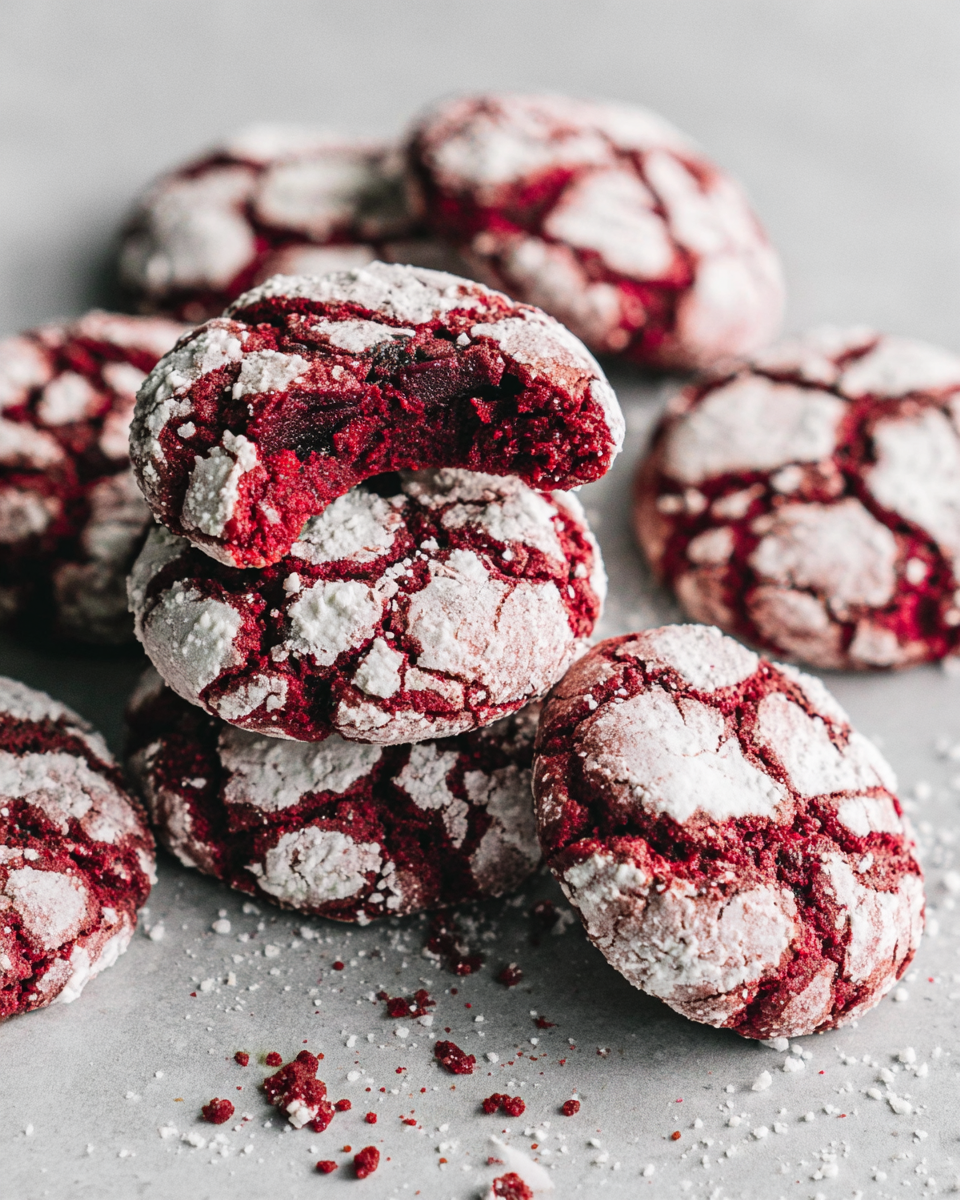
Red velvet crinkle cookies are a delightful twist on the classic dessert that captures the essence of celebration in every bite. Their vibrant red color, complemented by white powdered sugar, makes them an eye-catching addition to any festive gathering. These cookies offer a perfect intersection of a chewy, fudgy center and a delicate crinkled exterior.
The unique flavor profile of red velvet—typically a rich blend of cocoa and vanilla—creates a memorable treat that appeals to both cookie lovers and fans of cake alike. Enhanced with a touch of cream cheese, these cookies deliver a hint of tanginess that balances the sweetness beautifully.
Ingredients
- 2 cups all-purpose flour
The foundation of our cookies, all-purpose flour provides structure and stability. It helps the cookies maintain their shape while still allowing them to spread slightly during baking. - 1 teaspoon baking powder
Baking powder is a leavening agent that helps the cookies rise. It ensures that the cookies are light and chewy rather than dense, contributing to that ideal crinkle texture. - 1 teaspoon baking soda
Baking soda adds extra lift and helps the cookies spread. It reacts with the acidic ingredients, creating carbon dioxide bubbles that make the cookies fluffy. - 1/2 cup unsweetened cocoa powder
Cocoa powder imparts the classic chocolate flavor associated with red velvet. It also contributes to the rich color, making the contrast with the powdered sugar even more striking. - 1/2 teaspoon salt
Salt enhances the flavors of cookies, balancing sweetness and chocolate notes. A small amount is essential to elevate the overall taste profile. - 1/4 cup vegetable oil
Vegetable oil keeps the cookies moist and gives them a tender texture. It provides richness without adding a distinct flavor, allowing the chocolate and vanilla to shine. - 1 cup granulated sugar
Sugar sweetens the cookies and aids in achieving proper texture. It helps create that perfect chewy center that contrasts beautifully with the slightly crispy surface. - 1 large egg
Eggs bind the ingredients together and contribute moisture, resulting in a rich, fudgy finished product. The egg also aids in setting the structure of the cookie. - 1 teaspoon vanilla extract
Vanilla enhances the overall flavor profile of the cookies. It adds warmth and depth, making each bite even more enjoyable. - 1 tablespoon red food coloring
The signature red color comes from food coloring. This vibrant hue is what distinguishes red velvet from other types of cookies and adds to their festive appeal. - 1/2 cup powdered sugar, for rolling
Powdered sugar creates that beautiful crinkled appearance on the cookie surface. It also adds sweetness, balancing the rich chocolate flavor. - 1/3 cup cream cheese, softened
Cream cheese imparts a subtle tanginess and moisture, enhancing the fudgy texture of the cookies. It complements the sweetness and chocolate flavors wonderfully.
Directions & Preparation
Step 1: Preheat your oven to 350°F (175°C).
Preheating the oven is crucial for achieving the right texture and baking time for the cookies. An adequately heated oven ensures that the dough begins to set as soon as it enters, promoting that desirable crinkled texture and chewy center.
Step 2: In a large bowl, whisk together the flour, cocoa powder, baking powder, baking soda, and salt.
Combining the dry ingredients first allows for even distribution of the leavening agents and cocoa, which is vital for consistent baking. This step helps to avoid clumps of cocoa powder and ensures that the cookies rise uniformly.
Step 3: In another bowl, mix together the sugar and vegetable oil until well combined.
Creaming the sugar and oil thoroughly infuses air into the mixture, which is essential for achieving a light, airy cookie. This also helps distribute the sugar evenly, which contributes to the desired chewy texture.
Step 4: Add the egg, vanilla extract, and cream cheese to the oil and sugar mixture, and blend until smooth.
Incorporating the wet ingredients ensures they are well-combined, which is crucial for moisture and flavor development in the cookies. The cream cheese adds richness and a subtle tang, creating a well-rounded taste.
Step 5: Gradually incorporate the dry ingredients into the wet mixture, mixing until fully combined.
This step is essential to make sure the dough comes together without overmixing, which can lead to tough cookies. Mixing just until combined helps maintain their soft, fudgy texture.
Step 6: Add the red food coloring and mix until the dough is uniformly colored.
The food coloring should be added at the end to ensure an even distribution of color throughout the dough. This not only enhances the visual appeal but is also key to achieving that signature red velvet look.
Step 7: Chill the dough in the refrigerator for about 30 minutes to help firm it up.
Chilling the dough makes it easier to handle and shapes the cookies better, preventing excessive spreading during baking. This step allows the flavors to meld, resulting in a more cohesive taste.
Step 8: Scoop tablespoon-sized balls of dough and roll them in powdered sugar until well coated.
Rolling the dough in powdered sugar not only creates the iconic crinkle effect as the cookies bake but also adds a touch of sweetness to the exterior. This contrast to the fudgy center is delightful.
Step 9: Place the dough balls on a baking sheet lined with parchment paper, leaving space between them.
Spacing the dough on the baking sheet is important to give each cookie room to spread during baking. It ensures that they bake uniformly and do not merge into one another.
Step 10: Bake the cookies for 10-12 minutes, or until they start to crack on the top.
Baking until they crack is vital to achieving that signature look and texture. It's important not to overbake them; they should be soft to the touch when removed from the oven, as they will continue to firm up as they cool.
Step 11: Allow the cookies to cool on the baking sheet for a few minutes before transferring them to a wire rack.
Cooling them initially on the baking sheet allows them to set properly while they are still soft. Transferring them to a wire rack after a few minutes facilitates even cooling and prevents sogginess.

The Science Behind the Crinkle
The delightful crinkles on these cookies are not just for show; they are a product of the baking process. As the cookies rise due to the baking powder and baking soda, the surface dries out slightly, while the interior remains soft and chewy. This contrast is enhanced by the powdered sugar coating, which cracks as the cookies expand, resulting in their charming texture.
Customizing Your Cookies
One of the joys of baking these red velvet crinkle cookies is the opportunity to personalize them. You can incorporate chocolate chips, nuts, or even a splash of peppermint extract for a refreshing twist. Additionally, adjusting the amount of food coloring lets you create a subtle or bold version to fit any occasion.
Serving Suggestions for a Festive Touch
These cookies shine at celebrations and gatherings, and pairing them with a glass of cold milk or a cup of coffee can enhance the experience. For a more festive presentation, consider serving them on a decorated platter or alongside themed treats, turning your dessert table into a colorful display that delights guests of all ages.
FAQs
What should I do if my dough feels too soft to roll?
If your dough seems overly soft, chill it in the refrigerator for an additional 15-20 minutes. This will firm it up and make it easier to roll into balls.
Can I use less food coloring without impacting the color too much?
Yes, you can reduce the amount of food coloring; however, the cookies may not have the same intense red hue. Substitute with half the recommended amount for a lighter shade.
What if my cookies spread too much during baking?
Excessive spreading can occur if the dough is too warm or if the fat content is too high. Ensure the dough is chilled adequately before baking and try using less oil next time.
Can I add white chocolate chips to the batter?
Absolutely! White chocolate chips pair deliciously with red velvet flavors. Just fold them in gently after mixing the dry ingredients to maintain the dough's consistency.
What if my cookies turned out too dry?
Overbaking can lead to dry cookies. Keep a close eye on them while baking; they should be soft in the center when you remove them from the oven.
Can I substitute coconut oil for vegetable oil in this recipe?
Yes, coconut oil can be used as a substitute for vegetable oil. It might add a slight coconut flavor, but it will still create moist cookies.
Conclusion
Red velvet crinkle cookies are a fabulous way to add a touch of vibrancy and delight to any occasion. By following this recipe, you'll create soft, fudgy cookies that will impress family and friends alike. The combination of rich flavors and festive aesthetics makes them a perfect choice for celebrations.
So, gather your ingredients, and enjoy the process of baking these delightful treats. Each bite brings a moment of joy, making it well worth the effort. Happy baking!
Recipe Card

Layered Mexican Beef Casserole for Cozy Nights
Ingredients
- 1 lb ground beef
- 1 packet taco seasoning
- 1 can black beans 15 oz, drained and rinsed
- 1 cup corn kernels frozen or canned
- 2 cups tortilla chips crushed
- 2 cups salsa
- 2 cups shredded cheese cheddar or Mexican blend
- 1/2 cup sour cream
- 1/4 cup chopped fresh cilantro optional
- 1 jalapeño sliced (optional)
Instructions
- Preheat your oven to 350°F (175°C).
- In a large skillet, brown the ground beef over medium heat.
- Add the taco seasoning to the browned beef and mix well.
- Stir in black beans and corn, mixing until well combined.
- Spread a layer of crushed tortilla chips at the bottom of a greased casserole dish.
- Layer half of the beef mixture over the chips.
- Pour half of the salsa over the beef layer, spreading evenly.
- Sprinkle one cup of shredded cheese over the salsa.
- Repeat layering: chips, beef mixture, salsa, and cheese.
- Cover the casserole with aluminum foil and bake for 25 minutes.
- Remove the foil and bake for an additional 10-15 minutes, until cheese is bubbly.
- Let the casserole cool for a few minutes before serving.
- Garnish with fresh cilantro and jalapeño slices, if desired.
Notes
Additional serving suggestions: pair with a crisp salad, garlic bread, or roasted seasonal vegetables for balance.
For make-ahead, prep components separately and assemble just before heating to preserve texture.
Taste and adjust with acid (lemon/vinegar) and salt right at the end to wake up flavors.
