Introduction
There's something incredibly satisfying about baking your own bread at home, and Swirled Garlic Herb & Cheese Bread takes that experience to a whole new level. This loaf not only showcases a beautiful spiral of flavor but also fills your kitchen with an irresistible aroma that beckons everyone to gather around.
Imagine pulling apart soft, cheesy bread, bursting with the savory notes of garlic and fresh herbs. This recipe combines simple ingredients to create a loaf that’s suitable for any occasion, whether it’s a cozy family dinner or a casual gathering with friends. Baking this bread is as enjoyable as eating it!
Ingredients
- 4 cups all-purpose flour
Flour serves as the backbone of this bread, providing structure and chewiness that defines a great loaf. The protein content in all-purpose flour helps develop gluten, which gives the bread its characteristic texture. - 1 packet active dry yeast (2 1/4 teaspoons)
Yeast is crucial for fermentation, allowing the dough to rise and become light and airy. Active dry yeast requires activation in warm water, which helps kick-start the dough's rise. - 1 1/2 cups warm water (about 110°F)
Warm water activates the yeast, allowing it to ferment and create carbon dioxide bubbles that will leaven the dough. The right temperature is essential—too hot can kill the yeast, and too cold will slow it down. - 2 tablespoons sugar
Sugar not only adds a hint of sweetness but also feeds the yeast, promoting quicker fermentation. This helps achieve a better rise and contributes to a beautifully golden crust. - 2 teaspoons salt
Salt is vital for flavor and regulates yeast activity in the dough. It helps strengthen the gluten structure and ensures that the bread tastes well-balanced. - 4 tablespoons unsalted butter, softened
Butter adds richness and flavor to the bread, making it tender and moist. It also enhances the overall experience, lending a delightful buttery aroma. - 4 cloves garlic, minced
Garlic infuses the bread with a savory depth that's irresistible. It caramelizes slightly during baking, intensifying its flavor and complementing the cheese. - 1/2 cup grated cheese (like mozzarella or cheddar)
Cheese provides wonderful flavor and an appealing gooey texture. As it melts, it becomes pockets of deliciousness in every slice, enhancing the overall experience. - Fresh herbs (like basil, parsley, or rosemary), to taste
Fresh herbs add bright, fragrant notes to the bread, enhancing its savory profile. They provide color and contrast to the rich garlic and cheese.
Directions & Preparation
Step 1: Prepare the dough: In a small bowl, dissolve sugar and yeast in warm water. Let sit for 5-10 minutes until frothy.
Dissolving sugar with yeast in warm water helps to activate the yeast, kickstarting the fermentation process. After a few minutes, the froth indicates that the yeast is alive and ready to be incorporated into the dough, a crucial step for a good rise.
Step 2: In a large mixing bowl, combine flour and salt. Create a well in the center and add the yeast mixture and softened butter.
Mixing dry ingredients first is important to evenly distribute the salt, which can inhibit yeast growth if added directly. The well allows the liquid ingredients to be incorporated gradually without splattering.
Step 3: Mix until a shaggy dough forms, then knead on a floured surface for 8-10 minutes until smooth and elastic.
Kneading develops gluten, which gives the bread its structure and texture. A smooth, elastic dough indicates a good gluten development. If the dough sticks too much, adding a little extra flour can help.
Step 4: Place the kneaded dough in a greased bowl, cover with a damp towel, and let it rise in a warm place for about 1 hour until doubled in size.
The rising process allows the yeast to ferment, producing gas that expands the dough. Ensuring the dough is covered prevents it from drying out while rising, which is essential for achieving a soft texture.
Step 5: Prepare the cheese and herb filling: In a small bowl, mix grated cheese, minced garlic, and chopped herbs together.
Combining the filling ingredients beforehand ensures an even distribution of flavors throughout the bread. This blend will create a mouthwatering swirl when rolled into the dough.
Step 6: Once risen, punch down the dough to release excess gas, then roll it out into a rectangle about 1/2 inch thick.
Punching down the dough allows for a more controlled second rise, encouraging a finer crumb. Rolling it into an even shape is key for the final loaf’s spirals, promoting an aesthetic appearance and uniform baking.
Step 7: Sprinkle the cheese filling evenly over the rolled dough, pressing it lightly into the surface.
Even distribution of the filling ensures that each slice contains a delightful mix of flavors. Pressing it lightly will secure the filling in the dough, preventing it from spilling out during rolling.
Step 8: Roll the dough tightly from one end to the other, forming a log. Pinch the edges to seal.
Rolling tightly helps to create defined swirls within the bread, enhancing the visual appeal. Sealing the edges is crucial for preventing the filling from escaping while baking.
Step 9: Place the rolled dough seam-side down in a greased loaf pan. Cover and let rise for another 30-45 minutes.
Allowing the second rise will help the bread develop a light texture. Ensuring it's in a warm location will promote further yeast activity, making for a beautifully fluffy loaf.
Step 10: Preheat the oven to 350°F (175°C). Once the dough has risen, bake for 30-35 minutes until golden brown.
Baking at the right temperature ensures that the bread cooks evenly, achieving a golden crust while preserving a soft, tender inside. A tap on the crust should yield a hollow sound when fully baked.
Step 11: Cool in the pan for 10 minutes, then turn out onto a wire rack to cool completely before slicing.
Allowing the bread to cool prevents a gummy texture inside, as trapped steam can create moisture which affects the texture. Cooling on a wire rack evenly disperses air around the bread, helping maintain a crisp crust.

The Art of Rolling: Achieving Perfect Swirls
Achieving the perfect swirls in Swirled Garlic Herb & Cheese Bread requires practice and attention to detail. The key is to roll the dough tightly, ensuring the filling is evenly distributed and firmly secured inside. If you notice air pockets while rolling, gently reshape the dough and continue. A well-rolled loaf not only looks impressive but also guarantees that every slice delivers a satisfying burst of flavor.
Choosing the Right Cheese for Maximum Flavor
When it comes to cheese for your bread, your choice can transform the profile of the loaf. Cheeses like mozzarella provide meltiness, while sharper varieties like cheddar contribute a bold taste. Consider the balance of flavors; for instance, pairing a mild cheese with a stronger herb blend can elevate the entire experience. Don’t hesitate to experiment with different types or even mixes to find your favorite combination.
Herbs: Fresh vs. Dried—Which to Choose?
The choice between fresh and dried herbs can significantly affect the flavor of your bread. While fresh herbs bring vibrancy and brightness, dried herbs offer concentrated flavors. If using dried herbs, reduce the quantity as they are more potent. Ideally, pairing fresh herbs with garlic creates a delightful aroma that infused throughout the loaf. However, a mix of both can yield a pleasantly complex taste.
FAQs
What if my dough is too sticky during kneading?
If your dough is too sticky, gradually add a bit more flour, about a tablespoon at a time, until it reaches a manageable consistency. Be cautious not to add too much, as it may make the bread dense.
Can I use a bread machine for this recipe?
Yes, you can use a bread machine. Just add the ingredients in the order recommended by your machine, usually liquid first, followed by dry, and let it handle the mixing and rising.
What if my garlic is too strong for the filling?
If you find your garlic flavor is too overpowering, consider sautéing it in a bit of olive oil before mixing it into the filling. This will mellow its sharpness and bring out a sweet, subtle flavor.
How can I enhance the herb flavor in the bread?
To enhance the herb flavor, consider incorporating a herbed oil or butter on the crust before baking. Also, increase the amount of fresh herbs slightly without overcrowding to strike the right balance.
What should I do if my bread doesn’t rise well?
If your bread doesn’t rise, it could be due to inactive yeast. Ensure your yeast is fresh and the water temperature is right. If the room is too cold, let it rise in a slightly warmer area.
Can I use whole wheat flour instead of all-purpose flour?
You can substitute up to half of the all-purpose flour with whole wheat flour for added nutrition, but note that it may affect the texture, making the bread denser. Adjust liquid as needed.
Conclusion
Making Swirled Garlic Herb & Cheese Bread is more than just a recipe; it's a heartfelt invitation to indulge in the simple pleasures of home cooking. With each homemade loaf, you'll bring joy to your table and create lasting memories with your loved ones.
Once you've mastered this technique, consider experimenting with various fillings and flavors to make it truly your own. Each batch can be a new adventure, and your kitchen will become the heart of flavor-filled gatherings.
Recipe Card
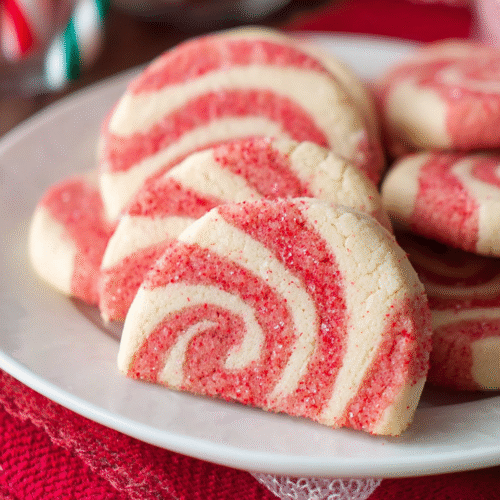
Peppermint Swirl Cookies – Festive Christmas Treats
Ingredients
- 2 ½ cups all-purpose flour
- 1 teaspoon baking powder
- ½ teaspoon salt
- ¾ cup unsalted butter softened
- 1 cup granulated sugar
- 1 large egg
- 1 teaspoon peppermint extract
- ½ cup crushed peppermint candies
- Red and green gel food coloring
Instructions
- Preheat your oven to 350°F (175°C).
- In a bowl, mix together flour, baking powder, and salt. Set aside.
- In a separate bowl, cream the softened butter and sugar until light and fluffy.
- Add the egg and peppermint extract to the butter mixture, beating until combined.
- Gradually add the dry ingredients to the wet mixture, mixing until just combined.
- Divide the dough in half. Add red food coloring to one half and green to the other, blending thoroughly.
- Scoop tablespoon-sized balls from each dough color and drop them onto a baking sheet, alternating colors for a swirled effect.
- Sprinkle crushed peppermint candies on top of the cookie mounds before baking.
- Bake for 10-12 minutes or until the edges are lightly golden.
- Allow the cookies to cool on the baking sheets for 5 minutes, then transfer them to wire racks to cool completely.
Notes
Additional serving suggestions: pair with a crisp salad, garlic bread, or roasted seasonal vegetables for balance.
For make-ahead, prep components separately and assemble just before heating to preserve texture.
Taste and adjust with acid (lemon/vinegar) and salt right at the end to wake up flavors.