Introduction
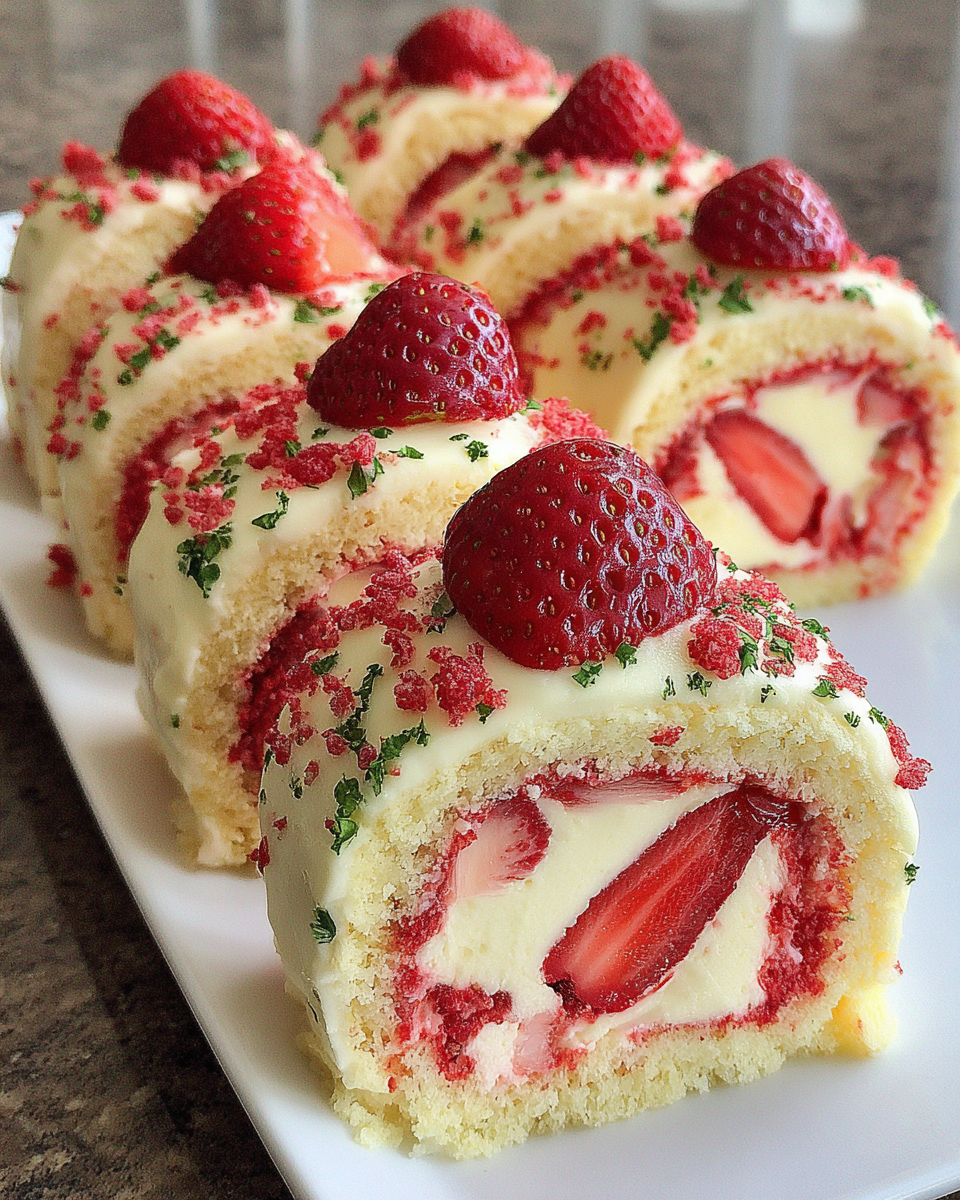
Strawberry shortcake sushi rolls offer a fresh twist on a beloved classic, combining the sweetness of strawberries with the fun presentation of sushi. This dessert provides an exciting way to indulge your sweet tooth while impressing friends and family.
The playful nature of these rolls makes them perfect for celebrations, potlucks, or even a cozy night in. With their vibrant colors and delightful flavors, they’re guaranteed to be a conversation starter at any gathering. Let's dive into crafting this creative dessert!
Ingredients
- 2 cups sushi rice
Sushi rice is essential for creating the base of the rolls. It has a sticky texture when cooked, allowing the rice to hold together and form the structure needed for rolling. - 2 1/2 cups water
Water is crucial for cooking the sushi rice properly. Ensuring the right water-to-rice ratio is essential for achieving that perfect chewy texture. - 1/4 cup sugar
Sugar sweetens the rice, helping to balance the tartness of the strawberries. It creates a delightful contrast that enhances the overall flavor of the dessert. - 1/4 cup rice vinegar
Rice vinegar adds a subtle tang to the sushi rice, enhancing its flavor and giving it a slightly savory profile that complements the sweetness of the strawberries. - 1/2 teaspoon salt
Salt rounds out the flavors in the sushi rice, ensuring that it doesn't taste overly sweet and enhances the overall taste of the rolls. - 1 cup heavy whipping cream
Heavy whipping cream will be whipped to create a rich, fluffy topping that mimics the traditional whipped cream found in strawberry shortcake. - 1 tablespoon powdered sugar
Powdered sugar is added to the whipped cream for sweetness and helps stabilize it, ensuring that it keeps its shape when spread onto the rolls. - 1 pound fresh strawberries
Strawberries are the star ingredient, adding refreshing juiciness and natural sweetness to each roll, resembling the filling of a classic shortcake. - 1 tablespoon lemon juice
Lemon juice is used to brighten and enhance the flavor of the strawberries while preventing them from browning too quickly. - Nori sheets (optional)
Nori sheets can be used as a fun outer wrapping for the rolls, giving a nod to traditional sushi while adding an unexpected layer of flavor, although they are not necessary for this dessert.
Directions & Preparation
Step 1: Rinse the sushi rice thoroughly under cold water until the water runs clear. This step is crucial as it removes excess starch, preventing the rice from becoming gummy.
Proper rinsing of the rice ensures a better texture once cooked. Gummy, overly sticky rice can affect the rolls' integrity and make them challenging to handle. Rinsing until the water is clear indicates that most of the starch has been washed away.
Step 2: In a medium pot, combine the rinsed sushi rice and water. Let it soak for 30 minutes before cooking.
Soaking allows the rice to absorb some water, which helps achieve a tender texture during cooking. This step makes a noticeable difference, providing a more even and fluffy result, perfect for rolling.
Step 3: Bring the rice to a boil over high heat, then reduce to a low simmer. Cover and cook for 18-20 minutes, or until all water is absorbed.
This cooking process is vital for achieving the correct rice texture. Keeping the pot covered helps steam the rice, resulting in soft yet sticky grains. Make sure to avoid removing the lid during cooking to keep the steam trapped.
Step 4: Once cooked, remove the pot from heat and let it sit covered for another 10 minutes to steam further.
Letting the rice rest ensures it finishes cooking in its own steam. This step enhances the rice texture, allowing it to become perfectly sticky and ready for rolling.
Step 5: In a small bowl, combine the sugar, rice vinegar, and salt. Gently fold this mixture into the cooked rice while it's still warm.
Adding this mixture while the rice is warm allows the sugar to dissolve fully, infusing the rice with sweetness and flavor. Be gentle during this step to avoid crushing the rice grains.
Step 6: Allow the seasoned rice to cool to room temperature.
Cooling is essential for rolling the sushi. If the rice is too hot, it can cause the fillings to melt or make the nori (if used) soggy. Patience in this step pays off in better-formed rolls.
Step 7: In a mixing bowl, whip the heavy cream with powdered sugar until soft peaks form.
Whipping the cream to the right consistency is key for stability in the rolls. The cream should be fluffy enough to hold its shape without being over-whipped, which can lead to a grainy texture.
Step 8: Slice the strawberries into thin strips and drizzle with lemon juice.
Slicing the strawberries enhances their sweetness while providing a pleasing texture in each bite. The lemon juice prevents browning and adds a hint of acidity, brightening the overall flavor of the filling.
Step 9: Now it’s time to assemble the sushi rolls! On a clean bamboo mat, spread a layer of sushi rice evenly, leaving a small border at the top edge.
Using a bamboo mat makes rolling much easier and creates a tighter sushi roll. The border is essential to allow the rice to adhere when rolling, ensuring the sushi keeps its shape.
Step 10: Layer the whipped cream and strawberry slices on top of the rice.
This step is where the magic happens. The combination of creamy and fruity fillings contrasts beautifully with the sweet, sticky rice. Be careful not to overfill, as it can make rolling difficult.
Step 11: Using the bamboo mat, carefully roll the rice over the filling, pressing gently to form a tight cylinder.
Tight rolling is crucial to maintain the shape of your sushi roll. Pressing too hard can crush the ingredients, while being too loose will cause it to unravel. Practice makes perfect with rolling techniques.
Step 12: Once rolled, slice the sushi using a sharp knife dipped in water to prevent sticking.
Wetting the knife ensures clean cuts without tearing the rice and filling. Aim for even slices to create visually appealing pieces. Each slice should reveal the beautiful colors of the strawberries and cream inside.
Step 13: Serve immediately to enjoy the freshness, or chill briefly before serving.
These sushi rolls are best enjoyed fresh to capture the bright flavors and textures. If you chill them, be cautious not to leave them too long, as the strawberries can lose their vibrancy and crispness.

Enhancing Flavor with Fresh Ingredients
Using ripe, in-season strawberries is crucial to achieving the best flavor in your strawberry shortcake sushi rolls. Fresh strawberries will have a natural sweetness and juiciness that canned or frozen alternatives simply can't match. Actively choosing berries that are at their peak not only improves taste but also adds a vibrant aesthetic to your dessert. Don’t hesitate to experiment with other fresh fruits as well, like raspberries or kiwi, for additional variety.
Garnishes that Make a Difference
Consider adding a sprinkle of toasted coconut or crushed graham crackers as a garnish for your strawberry shortcake sushi rolls. This not only enhances the visual appeal but also adds texture and a flavor reminiscent of traditional strawberry shortcake. A light dusting of powdered sugar or a drizzle of chocolate sauce can also elevate your dessert. Be creative and tailor your garnishes to match your personal taste or the occasion.
Perfecting Your Rolling Technique
Mastering the rolling technique is an integral part of creating beautiful sushi rolls. The pressure applied while rolling should be just right: not too tight, which can crush the ingredients, and not too loose, which can cause them to fall out. With practice, you’ll find the ideal rhythm for rolling. Remember, each piece doesn’t have to be perfect, but a sturdy roll can enhance the presentation and make serving easier.
FAQs
Can I use different fruits in these dessert rolls?
Absolutely! You can substitute strawberries with other fruits like mangoes, peaches, or blueberries to create delicious variations.
What can I do if my whipped cream turns out too thick?
If your whipped cream is too thick, you can gently fold in a little milk or cream to achieve your desired consistency without compromising its stability.
How should I cut the sushi rolls for the best presentation?
For the best visual presentation, use a sharp knife, dip it in warm water, and slice the rolls into even pieces to showcase the colorful filling.
Can I replace sushi rice with another type of rice?
Although sushi rice offers the best texture, you could try using short-grain rice as an alternative, keeping in mind the texture may differ.
What if my sushi rice is too dry after cooking?
If your rice is dry, it's likely that it didn't have enough water during the cooking process. To remedy this, you can add a little water while gently heating it again to soften.
Is it necessary to use nori sheets for these sushi rolls?
No, using nori sheets is optional. The rolls can be delicious and visually appealing without them, focusing entirely on the rice and filling.
Conclusion
Crafting strawberry shortcake sushi rolls is a fun and inventive way to explore dessert. This recipe encourages creativity in the kitchen, allowing you to adjust flavors and presentations to fit your style.
Whether served at a party or enjoyed as a special treat at home, these rolls will surely delight everyone. Happy cooking and enjoy this delightful fusion of flavors!
Recipe Card

Delightful Festive Christmas Cupcakes to Share
Ingredients
- 1 ½ cups all-purpose flour
- 1 cup granulated sugar
- ½ cup unsalted butter softened
- 2 large eggs
- 1 cup whole milk
- 1 tsp vanilla extract
- 1 ½ tsp baking powder
- ½ tsp salt
- 1 tsp ground cinnamon
- ½ tsp nutmeg
- 3 cups powdered sugar
- ½ cup cream cheese softened
- 1 tbsp milk for the frosting
- Sprinkles and edible decorations
Instructions
- Preheat your oven to 350°F (175°C).
- Line a cupcake pan with paper liners.
- In a large bowl, cream the softened butter and sugar together until light and fluffy.
- Add the eggs one at a time, beating well after each addition.
- Mix in the vanilla extract and milk until combined.
- In another bowl, whisk together the flour, baking powder, salt, cinnamon, and nutmeg.
- Gradually add the dry ingredients to the wet mixture, mixing until just combined.
- Divide the batter evenly among the prepared cupcake liners.
- Bake in the preheated oven for 18-20 minutes, or until a toothpick inserted comes out clean.
- Let the cupcakes cool in the pan for 5 minutes, then transfer to a wire rack to cool completely.
- While the cupcakes cool, prepare the frosting by beating together the cream cheese, powdered sugar, and milk until smooth and fluffy.
- Once the cupcakes are completely cool, frost them generously with the cream cheese frosting.
- Decorate with festive sprinkles and edible decorations as desired.
Notes
Additional serving suggestions: pair with a crisp salad, garlic bread, or roasted seasonal vegetables for balance.
For make-ahead, prep components separately and assemble just before heating to preserve texture.
Taste and adjust with acid (lemon/vinegar) and salt right at the end to wake up flavors.