Introduction
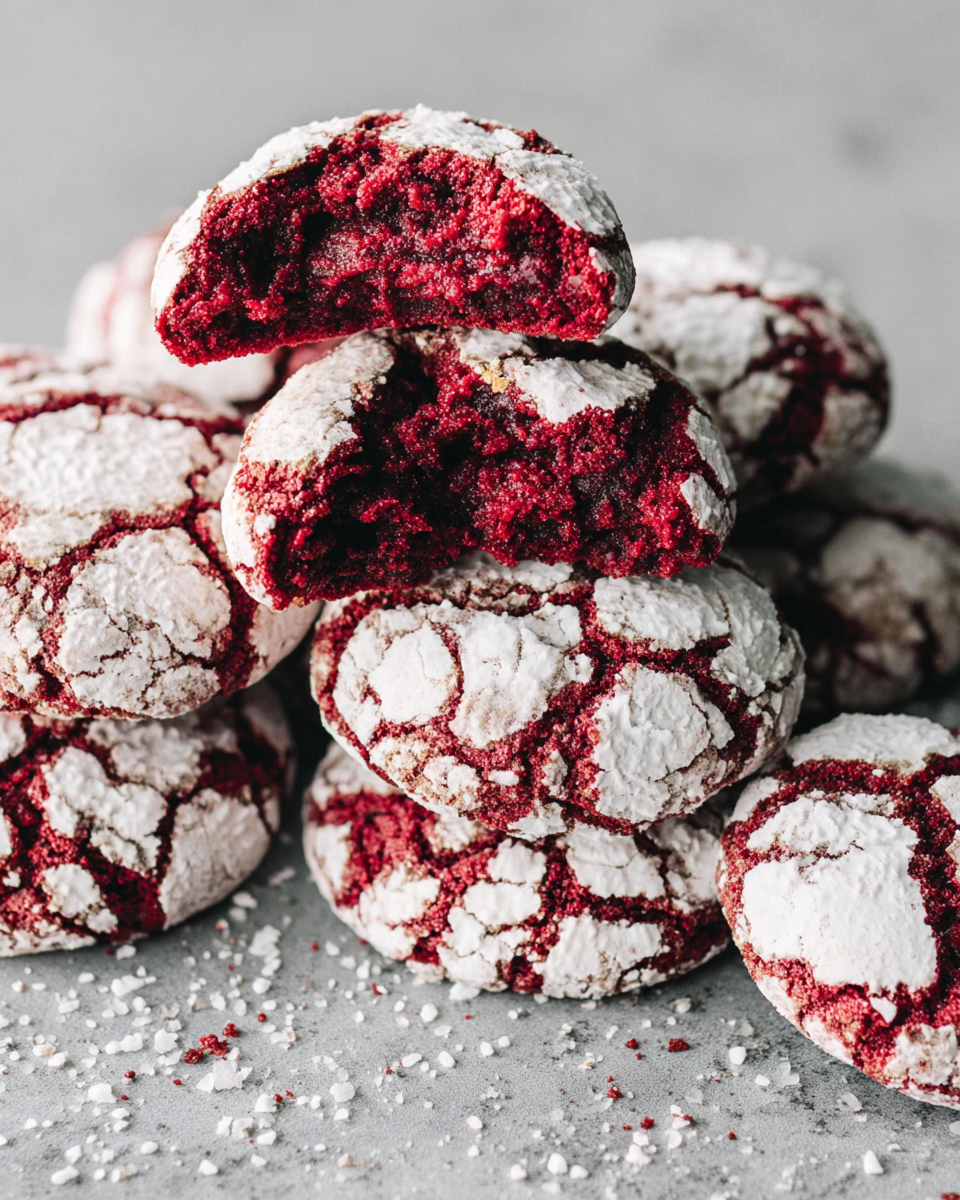
The holiday season is synonymous with rich, vibrant flavors and joyous gatherings, making it the perfect time to showcase a delightful treat: red velvet crinkle cookies. These sweet creations are not only visually stunning with their deep red hue but also deliver an indulgent fudgy experience that is hard to resist.
Crinkle cookies are known for their unique cracked surface, which forms during the baking process due to the moisture-rich dough. The combination of cocoa powder and red food coloring gives these cookies their signature color and flavor while producing a chewy texture that pairs wonderfully with a light dusting of powdered sugar. Perfect for holiday gifting or sharing at festive gatherings, they are sure to impress.
Ingredients
- 2 cups all-purpose flour
The backbone of the cookie, all-purpose flour provides structure and stability to the dough while allowing it to maintain a light, chewy texture. - 1/2 cup unsweetened cocoa powder
This ingredient enriches the cookies with chocolate flavor, essential for creating that classic red velvet taste, and contributes to the cookies' fudgy consistency. - 1 teaspoon baking powder
Baking powder acts as a leavening agent, helping the cookies rise slightly during baking and combined with the moisture of the other ingredients to create a soft interior. - 1/4 teaspoon salt
Salt enhances the overall flavor of the cookies, balancing the sweetness and intensifying the rich taste of chocolate. - 1/2 cup unsalted butter, softened
Butter adds creaminess and flavor, contributing to the cookies' tender crumb while helping to bind the other ingredients. - 1 cup granulated sugar
Sugar not only sweetens the cookies but also plays a critical role in the texture, lending moisture and encouraging that chewy finish. - 1 large egg
Eggs provide moisture and act as a binding agent, helping to create a cohesive dough that results in soft, chewy cookies. - 1 tablespoon red food coloring
This vibrant coloring is what makes these cookies visually striking, essential for achieving the iconic red velvet effect. - 1 teaspoon vanilla extract
Vanilla adds depth and warmth in flavor, enhancing the overall sweetness of the cookies and complementing the chocolate. - 1 cup powdered sugar for dusting
Powdered sugar gives the cookies an appealing finish, not only adding sweetness but also creating that classic crinkle look.
Directions & Preparation
Step 1: Preheat the oven to 350°F (175°C).
Starting with a properly preheated oven is crucial for even baking. This ensures that the cookies spread uniformly and develop the desirable texture without becoming overly dry.
Step 2: In a medium bowl, whisk together the flour, cocoa powder, baking powder, and salt.
Whisking these dry ingredients helps to evenly distribute the cocoa and leavening agent, preventing any clumps that might otherwise affect the cookie's texture and flavor.
Step 3: In a large bowl, cream together the softened butter and sugar until light and fluffy.
Creaming the butter and sugar incorporates air into the mixture, which is vital for a light texture in the final cookies. It should take about 3-5 minutes to achieve the right consistency.
Step 4: Beat in the egg, red food coloring, and vanilla extract until fully combined.
Incorporating these ingredients adds moisture and flavor to the dough, and ensures that the red color is evenly distributed throughout the mixture.
Step 5: Gradually add the dry ingredients to the wet ingredients, mixing until just combined.
Overmixing can lead to tough cookies, so it's important to mix until you no longer see flour, ensuring a tender and chewy finish.
Step 6: Chill the dough for at least 30 minutes in the refrigerator.
Chilling the dough allows the flavors to meld and makes the dough easier to handle, preventing the cookies from spreading too much during baking.
Step 7: Scoop the chilled dough into 1.5-inch balls and roll them in powdered sugar before placing them on a baking sheet.
Rolling the dough in powdered sugar not only prevents sticking but also creates the crinkle effect on the surface as they bake. It’s a key step for achieving that signature look.
Step 8: Bake in the preheated oven for 10-12 minutes, or until the edges look set and the tops are crinkled.
Baking until the edges are set while keeping the centers slightly soft ensures a fudgy interior. Watch closely to prevent overbaking, which can result in a drier cookie.
Step 9: Allow the cookies to cool on the baking sheet for a few minutes before transferring to a wire rack to cool completely.
Cooling on the baking sheet allows the cookies to firm up without becoming hard. Transferring them too soon may lead to breakage, so patience is key.

The Joy of Crinkles
The allure of crinkle cookies lies not just in their flavor but also in their visual appeal. Each cookie’s unique cracked surface hints at the fudgy texture within, making them a centerpiece on any dessert table. During baking, the moisture in the dough creates steam, causing the top to crack as they rise. This natural beauty, complemented by a light dusting of powdered sugar, makes them the perfect festive treat.
A Flavorful Twist on Tradition
Red velvet, originally a sophisticated dessert, transforms into delicious cookies that retain all the beloved elements of the classic cake. The marriage of chocolate and a hint of vanilla, combined with the vibrant color, elevates the cookie experience. These treats transition seamlessly from daytime snacking to evening desserts, bridging the gap between casual and celebratory occasions.
The Perfect Gift for the Holidays
Cookies always make for a heartfelt gift during the festive season, and red velvet crinkle cookies are no exception. Their bright color and rich taste make them not only visually stunning but also a delight to the palate. Packaged in a decorative box or jar, they convey thoughtfulness and care, making them an ideal choice for colleagues, friends, or loved ones, adding a personal touch to the season of giving.
FAQs
Why do my cookies not have a crinkle effect?
If the cookies don't crinkle, they may not have been chilled long enough, or the dough may have been overmixed. Proper chilling before baking is critical for achieving the desired texture.
Can I use cake flour instead of all-purpose flour for a lighter texture?
Yes, you can use cake flour, but it may alter the structure slightly, making the cookies more delicate. Adjust the amount accordingly, as cake flour is lighter.
What if my cookie dough is too sticky to handle?
If the dough is too sticky, it might need more chilling time. Dust your hands with flour or powdered sugar to help shape and roll the cookies without making a mess.
How can I make my cookies more chocolatey?
For a richer chocolate flavor, increase the cocoa powder slightly or add chocolate chips to the dough. Be mindful of the balance of dry ingredients.
What should I do if my cookies turn out too dry?
If your cookies are dry, they might have been overbaked. Always monitor baking times closely. Consider slightly reducing the baking time for chewier cookies.
How can I enhance the holiday flair of my cookies?
To amp up the festive spirit, consider adding seasonal spices like cinnamon or nutmeg, or even incorporating crushed peppermint for a refreshing twist.
Conclusion
Red velvet crinkle cookies are a delightful addition to any holiday spread, embodying the spirit of the season with their vibrant color and rich taste. Each bite offers a satisfying contrast between the soft interior and the slightly crisp outer shell.
Whether enjoyed with a cup of tea or presented as a gift, these cookies are sure to brighten any occasion. Embrace the joy of baking and share these festive treats with family and friends this holiday season.
Recipe Card

Delightful White Chocolate Peppermint Cupcakes
Ingredients
- 1 cup all-purpose flour
- 1/2 cup unsweetened cocoa powder
- 1 cup granulated sugar
- 1/2 cup unsalted butter softened
- 2 large eggs
- 1 teaspoon vanilla extract
- 1/2 cup white chocolate chips
- 1/2 teaspoon peppermint extract
- 1/4 teaspoon salt
- 1/2 cup heavy cream
- Additional white chocolate for garnish
Instructions
- Preheat the oven to 350°F (175°C) and line a cupcake pan with liners.
- In a mixing bowl, cream together the softened butter and granulated sugar until light and fluffy.
- Add the eggs one at a time, mixing well after each addition. Then, mix in the vanilla extract.
- In a separate bowl, whisk together the flour, cocoa powder, baking powder, and salt.
- Gradually combine the dry ingredients with the wet mixture, alternating with buttermilk until just combined.
- Fold in the white chocolate chips and peppermint extract gently.
- Divide the batter evenly among the cupcake liners and bake for 18-20 minutes.
- Allow the cupcakes to cool in the pan for about 10 minutes before transferring them to a wire rack.
- While the cupcakes cool, whip the heavy cream until soft peaks form.
- Frost the cooled cupcakes with whipped cream and garnish with white chocolate shavings.
- Serve your White Chocolate Peppermint Cupcakes and enjoy!
Notes
Additional serving suggestions: pair with a crisp salad, garlic bread, or roasted seasonal vegetables for balance.
For make-ahead, prep components separately and assemble just before heating to preserve texture.
Taste and adjust with acid (lemon/vinegar) and salt right at the end to wake up flavors.