Introduction
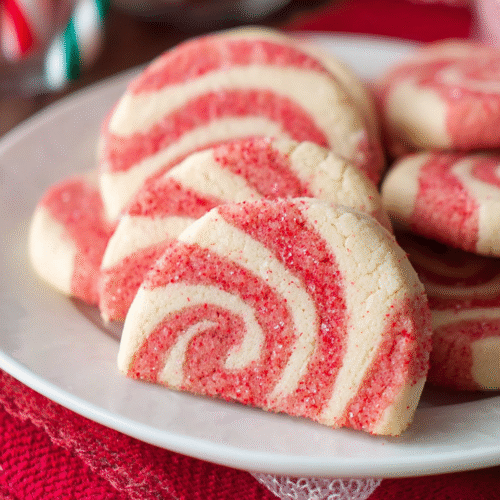
When the holiday season rolls in, it brings along many cherished traditions, and baking cookies is undoubtedly one of them. Among the vast array of holiday treats, peppermint swirl cookies stand out with their festive flair and delightful taste.
These cookies not only bring the classic flavor of peppermint but also showcase a beautiful swirl that adds to their visual appeal. Perfect for sharing with family and friends, they also make great gifts during this joyful season.
Ingredients
- 2 ½ cups all-purpose flour
All-purpose flour serves as the base, providing structure and stability to the cookies. It helps in achieving a light texture while allowing the swirls to hold their shape. - 1 teaspoon baking powder
Baking powder acts as a leavening agent, ensuring that the cookies rise and are not too dense. It helps create a fluffy soft texture that contrasts beautifully with the crunchy candy pieces. - ½ teaspoon salt
Salt enhances the flavors in cookies, balancing the sweetness and intensifying the overall taste. It’s an essential ingredient that elevates all the other components. - ¾ cup unsalted butter, softened
Butter is a key player in cookie recipes, contributing to flavor and a tender crumb. Softened butter ensures proper incorporation with sugar, leading to the right texture. - 1 cup granulated sugar
Granulated sugar sweetens the cookies and aids in the creaming process with butter, adding air and helping the cookies to rise. - 1 large egg
Eggs bind the ingredients together, providing moisture and richness. The egg also contributes to the structure of the cookies. - 1 teaspoon peppermint extract
Peppermint extract is the star ingredient that gives these cookies their distinct holiday flavor, providing a refreshing kick that embodies the spirit of Christmas. - ½ cup crushed peppermint candies
These not only enhance the peppermint flavor but also add a delightful crunch and holiday color. The candies melt slightly during baking, creating a beautiful swirl in each cookie. - Red and green gel food coloring
Adding gel food coloring allows for vibrant, festive swirls in the dough. It makes the cookies visually striking, bringing a touch of holiday cheer to every batch.
Directions & Preparation
Step 1: Preheat your oven to 350°F (175°C).
Preheating the oven ensures that the cookies bake evenly and achieve the desired texture. If the oven isn’t hot enough, the cookies may spread too much or not rise properly.
Step 2: In a bowl, mix together flour, baking powder, and salt. Set aside.
This step ensures that the leavening agent and salt are evenly distributed throughout the flour. Mixing these dry ingredients before adding them to the wet ingredients promotes uniformity in the dough.
Step 3: In a separate bowl, cream the softened butter and sugar until light and fluffy.
Creaming butter and sugar is crucial for achieving the right texture. The process incorporates air into the mixture, which helps in leavening the cookies, contributing to a light end product.
Step 4: Add the egg and peppermint extract to the butter mixture, beating until combined.
Adding the egg introduces moisture and richness, while the peppermint extract infuses the dough with its signature flavor. Beat well to ensure everything is thoroughly mixed.
Step 5: Gradually add the dry ingredients to the wet mixture, mixing until just combined.
Carefully combining the dry and wet ingredients prevents overmixing, which can lead to tough cookies. Mixing until just combined retains the tender texture that cookies are known for.
Step 6: Divide the dough in half. Add red food coloring to one half and green to the other, blending thoroughly.
This step creates the vibrant colors that will form the swirls in the cookies. Ensure the coloring is evenly incorporated to achieve a beautiful presentation.
Step 7: Scoop tablespoon-sized balls from each dough color and drop them onto a baking sheet, alternating colors for a swirled effect.
Scooping alternating colors ensures that the swirls mix during baking, creating a visually appealing cookie. Don’t overcrowd the baking sheet to allow for proper spreading.
Step 8: Sprinkle crushed peppermint candies on top of the cookie mounds before baking.
Adding peppermint candies prior to baking infuses the cookies with a refreshing flavor. The candies will melt slightly during the baking process, enhancing the cookies’ design.
Step 9: Bake for 10-12 minutes or until the edges are lightly golden.
Baking time can vary depending on your oven and cookie size, so keep an eye on the cookies. Slightly golden edges indicate that they are done while still maintaining a soft center.
Step 10: Allow the cookies to cool on the baking sheets for 5 minutes, then transfer them to wire racks to cool completely.
Cooling on the baking sheet helps set the cookies while they are still soft. Transferring them to wire racks allows for even cooling, preventing them from becoming soggy on the bottom.

Creating Perfect Swirls in Your Cookies
Achieving those perfect swirls in peppermint cookies isn’t just about dividing the dough; it's also about technique. Use a light hand when scooping, making sure to alternate colors without overmixing. A gentle twist of the dough when placing it on the baking sheet can enhance the swirl effect, ensuring an eye-catching presentation while maintaining the distinct flavors that each color brings.
The Magic of Peppermint Flavor
Peppermint extract is the key to bringing the holiday spirit into your cookies, but it’s vital to use it judiciously. Overdoing it can lead to an overwhelmingly minty taste that can overshadow other ingredients. It's best to start with a small amount, taste the dough if you're comfortable, and adjust as needed. This way, you ensure that the peppermint complements rather than dominates the cookie profile.
Storing and Gifting Your Peppermint Swirl Cookies
These cookies are perfect for sharing with loved ones. Once cooled, store the cookies in an airtight container; they’ll stay fresh for up to a week. If gifting, arrange them in a festive tin or wrap them in cellophane tied with ribbon. Not only do they make for a delightful seasonal treat, but their vibrant appearance adds a personal touch to any holiday celebration.
FAQs
What can I do if my cookie dough is too thick?
If your dough feels too thick, consider adding a tablespoon of milk or water to moisten it slightly. This helps with the consistency, making it easier to scoop and allowing the cookies to spread appropriately.
How can I enhance the peppermint flavor without overdoing it?
To enhance the peppermint flavor subtly, consider adding finely crushed peppermint candies directly into the dough. Start with a small quantity and adjust to your taste preference, ensuring the flavor is refreshing but not overpowering.
What should I do if my cookies spread too much during baking?
Excessive spreading can be caused by dough that is too warm or not chilled enough before baking. Ensure that your dough is adequately chilled, and try separating the cookie balls further on the baking sheet to avoid them merging.
Can I use artificial food coloring instead of gel food coloring?
While gel food coloring is best for vibrant swirls, you can use liquid food coloring. However, you will need to add it gradually to achieve the desired color, as it might alter the dough's consistency more than gel.
What if my cookies turn out too sweet?
If you find the cookies overly sweet, consider reducing the sugar in your next batch by about ¼ cup. Balancing with a touch more salt might also help cut through the sweetness.
Can I make these cookies larger for a more substantial treat?
Yes, you can scoop larger balls of dough. Just remember to adjust the baking time accordingly to ensure they are fully cooked through the center while not burning the edges.
Conclusion
Peppermint swirl cookies are more than just a delightful treat; they are a celebration of the holiday spirit. Their vibrant colors and refreshing flavor create a joyous experience for both bakers and eaters alike.
By following this recipe, you can create a festive batch that will impress at any holiday gathering. As you enjoy the baking process, remember that the joy of sharing these cookies is what truly makes them special.
Recipe Card
Peppermint Swirl Cookies – Festive Christmas Treats
Ingredients
- 2 ½ cups all-purpose flour
- 1 teaspoon baking powder
- ½ teaspoon salt
- ¾ cup unsalted butter softened
- 1 cup granulated sugar
- 1 large egg
- 1 teaspoon peppermint extract
- ½ cup crushed peppermint candies
- Red and green gel food coloring
Instructions
- Preheat your oven to 350°F (175°C).
- In a bowl, mix together flour, baking powder, and salt. Set aside.
- In a separate bowl, cream the softened butter and sugar until light and fluffy.
- Add the egg and peppermint extract to the butter mixture, beating until combined.
- Gradually add the dry ingredients to the wet mixture, mixing until just combined.
- Divide the dough in half. Add red food coloring to one half and green to the other, blending thoroughly.
- Scoop tablespoon-sized balls from each dough color and drop them onto a baking sheet, alternating colors for a swirled effect.
- Sprinkle crushed peppermint candies on top of the cookie mounds before baking.
- Bake for 10-12 minutes or until the edges are lightly golden.
- Allow the cookies to cool on the baking sheets for 5 minutes, then transfer them to wire racks to cool completely.
Notes
Additional serving suggestions: pair with a crisp salad, garlic bread, or roasted seasonal vegetables for balance.
For make-ahead, prep components separately and assemble just before heating to preserve texture.
Taste and adjust with acid (lemon/vinegar) and salt right at the end to wake up flavors.