Introduction
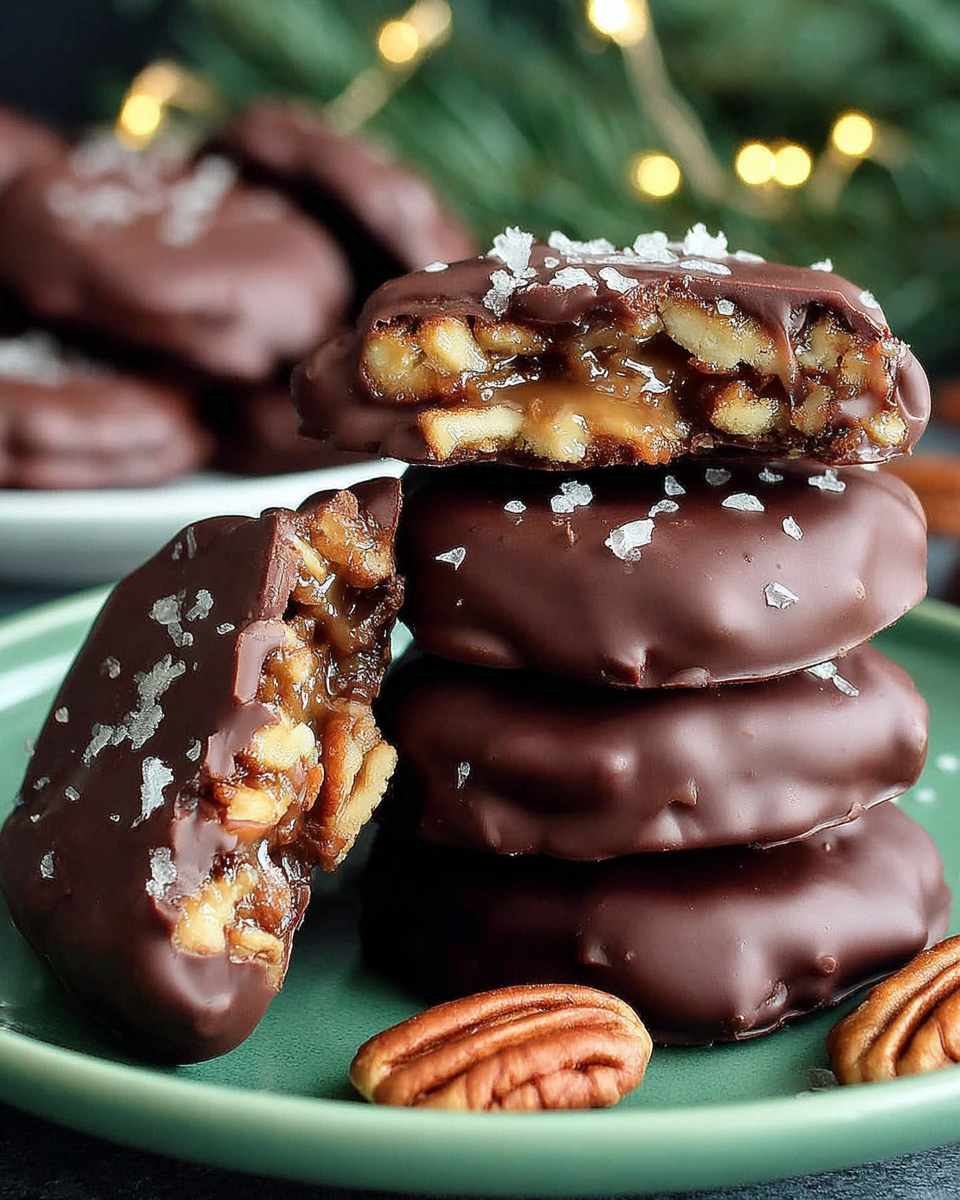
The holiday season is the perfect time to indulge in sweet treats, and making your own Christmas Pecan Turtles is a delightful way to celebrate. These charming confections combine rich chocolate, creamy caramel, and the irresistible crunch of pecans, creating a harmonious blend of flavors and textures. Not only do they taste amazing, but they're also a fun activity for the whole family to enjoy during the festive period.
Imagine making these delicious candies while sharing laughter and stories with loved ones. This recipe allows you to craft your own holiday gifts or indulge in a personal treat that rivals what you'd find in high-end candy shops. The best part? They are simple to make, requiring just a few ingredients and minimal cooking skills. So, let's dive in!
Ingredients
- 2 cups pecan halves
Pecan halves are the star of this recipe, providing a rich, buttery flavor and a satisfying crunch. They also help create the classic turtle shape, resting comfortably beneath the other layers. - 14 ounces caramels, unwrapped
Caramels create a luscious, gooey center for the turtles. When melted, they become perfectly sticky and sweet, harmonizing beautifully with the chocolate and nuts. - 2 tablespoons heavy cream
Heavy cream helps to soften the texture of the caramel when melted, making it easier to work with and ensuring that it adheres well to the pecans. - 12 ounces semisweet chocolate chips
Semisweet chocolate chips provide a rich, chocolaty coating that balances the sweetness of the caramel. They melt easily, ensuring a smooth finish to the turtles. - 1 teaspoon vanilla extract
Vanilla extract adds a warm, aromatic note that enhances the overall flavor of the turtles, making each bite feel more indulgent.
Directions & Preparation
Step 1: Preheat your oven to 350°F (175°C).
Preheating the oven is essential as it ensures your pecans toast evenly. This step brings out their flavor, making them nuttier and more fragrant, which will enhance the overall taste of the turtles.
Step 2: Spread the pecans in a single layer on a baking sheet and toast for about 8-10 minutes.
Toasting the pecans intensifies their flavor and gives them a satisfying crunch. Keep an eye on them so they don’t burn; you want them golden and aromatic. Allow them to cool slightly before handling.
Step 3: While the pecans cool, melt the caramels and heavy cream together in a saucepan over low heat, stirring until smooth.
Melting the caramels with cream creates a silky texture that melds effortlessly, making it easier to drop onto the pecan clusters. Stir constantly to prevent sticking or scorching, ensuring a fully melted mixture.
Step 4: Once melted, remove from heat and let the caramel cool slightly before proceeding.
Cooling the caramel slightly makes it less runny and easier to work with. If it’s too hot, it might not hold its shape when poured over the pecans, making your turtles more difficult to assemble.
Step 5: Arrange groups of three pecan halves on a parchment-lined baking sheet, forming little clusters.
Creating clusters of pecans mimics the classic turtle shape, making each candy visually appealing. Try to keep them close together to ensure the caramel holds them in place nicely.
Step 6: Spoon a small amount of the caramel mixture over each cluster, allowing it to ooze slightly.
This step is key to achieving that traditional turtle look. Ensure each pecan cluster is well-coated, letting the caramel drip down into the nooks, which adds to the visual appeal and flavors.
Step 7: Place the baking sheet in the refrigerator for about 30 minutes to allow the caramel to set.
Chilling is vital for helping the caramel firm up, making it easier to coat with chocolate later. This also creates a delightful contrast between the smooth and chewy textures.
Step 8: While the caramel sets, melt the chocolate chips in a microwave-safe bowl in 30-second intervals, stirring until fully melted and smooth.
Microwave melting helps maintain the chocolate’s texture without burning it. Stirring frequently ensures a uniform melt, resulting in a glossy finish that will coat the turtles beautifully.
Step 9: Remove the caramel-coated pecan clusters from the fridge and carefully dip each one into the melted chocolate, coating it completely.
Dipping into chocolate creates a luscious outer layer that encases the sweet pecans and caramel. Make sure each turtle is fully covered to provide a delightful contrast of flavors.
Step 10: Return the chocolate-coated turtles to the parchment-lined sheet and allow them to set at room temperature or in the fridge until the chocolate hardens.
Letting the turtles set ensures the chocolate firms up nicely, creating a satisfying bite once they’re ready to be enjoyed. Patience is crucial here for that perfect texture when you take your first bite.

The Perfect Touch of Sweetness
In creating these Christmas Pecan Turtles, the balance of sweetness is essential. The interplay of caramel's rich sweetness and the semisweet chocolate coat results in a truly harmonious treat. The toasted pecans add that delightful crunch that contrasts with the smooth chocolate and gooey caramel, ensuring that each bite is satisfyingly sweet without being overwhelming.
Customizing Your Turtles
Feel free to get creative with your Christmas Pecan Turtles! You can experiment with different types of chocolate, such as dark or white chocolate, to change the flavor profile. Adding a sprinkle of sea salt on top before the chocolate sets creates an exquisite sweet-and-salty contrast. Additionally, incorporating spices such as cinnamon or nutmeg into the caramel can add an aromatic holiday twist.
Gifting Made Easy
These turtles make a wonderful, thoughtful gift during the festive season. Pack them carefully in decorative boxes or tins, and you have a heartfelt homemade gift that friends and family will appreciate. Creating a batch of Christmas Pecan Turtles not only fills your home with festive aromas but also strengthens bonds as you share these delicious creations with those you love.
FAQs
What if my caramel mixture is too thick?
If the caramel is too thick, you can add a bit more heavy cream while melting to help loosen it up. This will make it easier to spoon over the pecans.
Can I use other nuts instead of pecans?
Yes, feel free to substitute walnuts or almonds. They will change the flavor slightly but still provide that wonderful crunch we're looking for.
What if the chocolate coating is too thin?
If your chocolate coating seems too thin, ensure you're using enough chocolate chips and melting them completely. A thicker layer will provide a more satisfying bite.
How do I prevent the chocolate from melting back into the caramel?
Make sure the caramel is completely cooled and set before dipping into chocolate. A solid caramel will help keep the layers distinct.
Can I make a double batch of this recipe?
Absolutely! Just remember to use a larger baking sheet and be mindful of the setting time, as a bigger batch might take a little longer to cool down.
What if my turtles fall apart when I try to move them?
If they fall apart, it may be due to not letting the caramel cool enough. Next time, ensure they are set firm before trying to move them.
Conclusion
Crafting Easy Christmas Pecan Turtles at home brings not only a delicious treat but also a satisfying sense of accomplishment. Whether enjoyed with family or given as a gift, these delightful candies evoke the spirit of the season. With just a few quality ingredients and some essential techniques, anyone can master this simple yet impressive recipe.
So this holiday season, make a batch of these turtles and enjoy the smiles they bring. There’s something incredibly rewarding about homemade treats that store-bought versions simply can’t match—both in flavor and the love poured into each piece.
Recipe Card
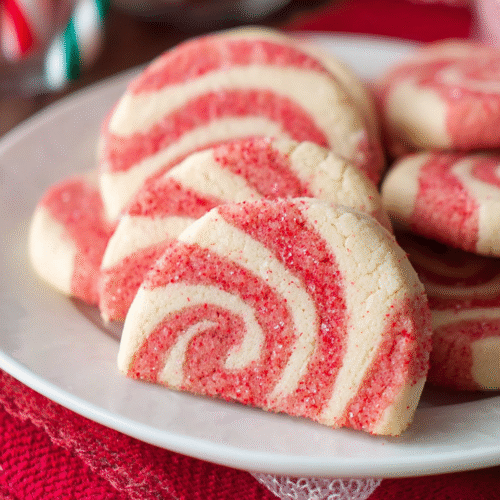
Peppermint Swirl Cookies – Festive Christmas Treats
Ingredients
- 2 ½ cups all-purpose flour
- 1 teaspoon baking powder
- ½ teaspoon salt
- ¾ cup unsalted butter softened
- 1 cup granulated sugar
- 1 large egg
- 1 teaspoon peppermint extract
- ½ cup crushed peppermint candies
- Red and green gel food coloring
Instructions
- Preheat your oven to 350°F (175°C).
- In a bowl, mix together flour, baking powder, and salt. Set aside.
- In a separate bowl, cream the softened butter and sugar until light and fluffy.
- Add the egg and peppermint extract to the butter mixture, beating until combined.
- Gradually add the dry ingredients to the wet mixture, mixing until just combined.
- Divide the dough in half. Add red food coloring to one half and green to the other, blending thoroughly.
- Scoop tablespoon-sized balls from each dough color and drop them onto a baking sheet, alternating colors for a swirled effect.
- Sprinkle crushed peppermint candies on top of the cookie mounds before baking.
- Bake for 10-12 minutes or until the edges are lightly golden.
- Allow the cookies to cool on the baking sheets for 5 minutes, then transfer them to wire racks to cool completely.
Notes
Additional serving suggestions: pair with a crisp salad, garlic bread, or roasted seasonal vegetables for balance.
For make-ahead, prep components separately and assemble just before heating to preserve texture.
Taste and adjust with acid (lemon/vinegar) and salt right at the end to wake up flavors.